A step-by-step guide on how I successfully swap the graphics card to K1100M on my 2011 27″ iMac and install Catalina in this unsupported system. I decided to take on this project due to the infamous Apple AMD GPU failure so that I can continue getting life out of my iMac.
This process applies to my own system, which may or may not work exactly the same for other systems with different specs.
Credit to those in this thread over at MacRumors for making this project possible.
Disclaimer: These are my personal steps on how I successfully did this swap. I am not responsible for any issues if you choose to take on this project. Use this with caution.
My system:
- 2011 iMac 27″
- AMD HD 6790M 2GB (failed)
What works that is usually broken with these swaps:
- Boot up screen
- Brightness control
- Fan control
- Wake from sleep
- AirPlay
- Intel Quick Sync Video feature
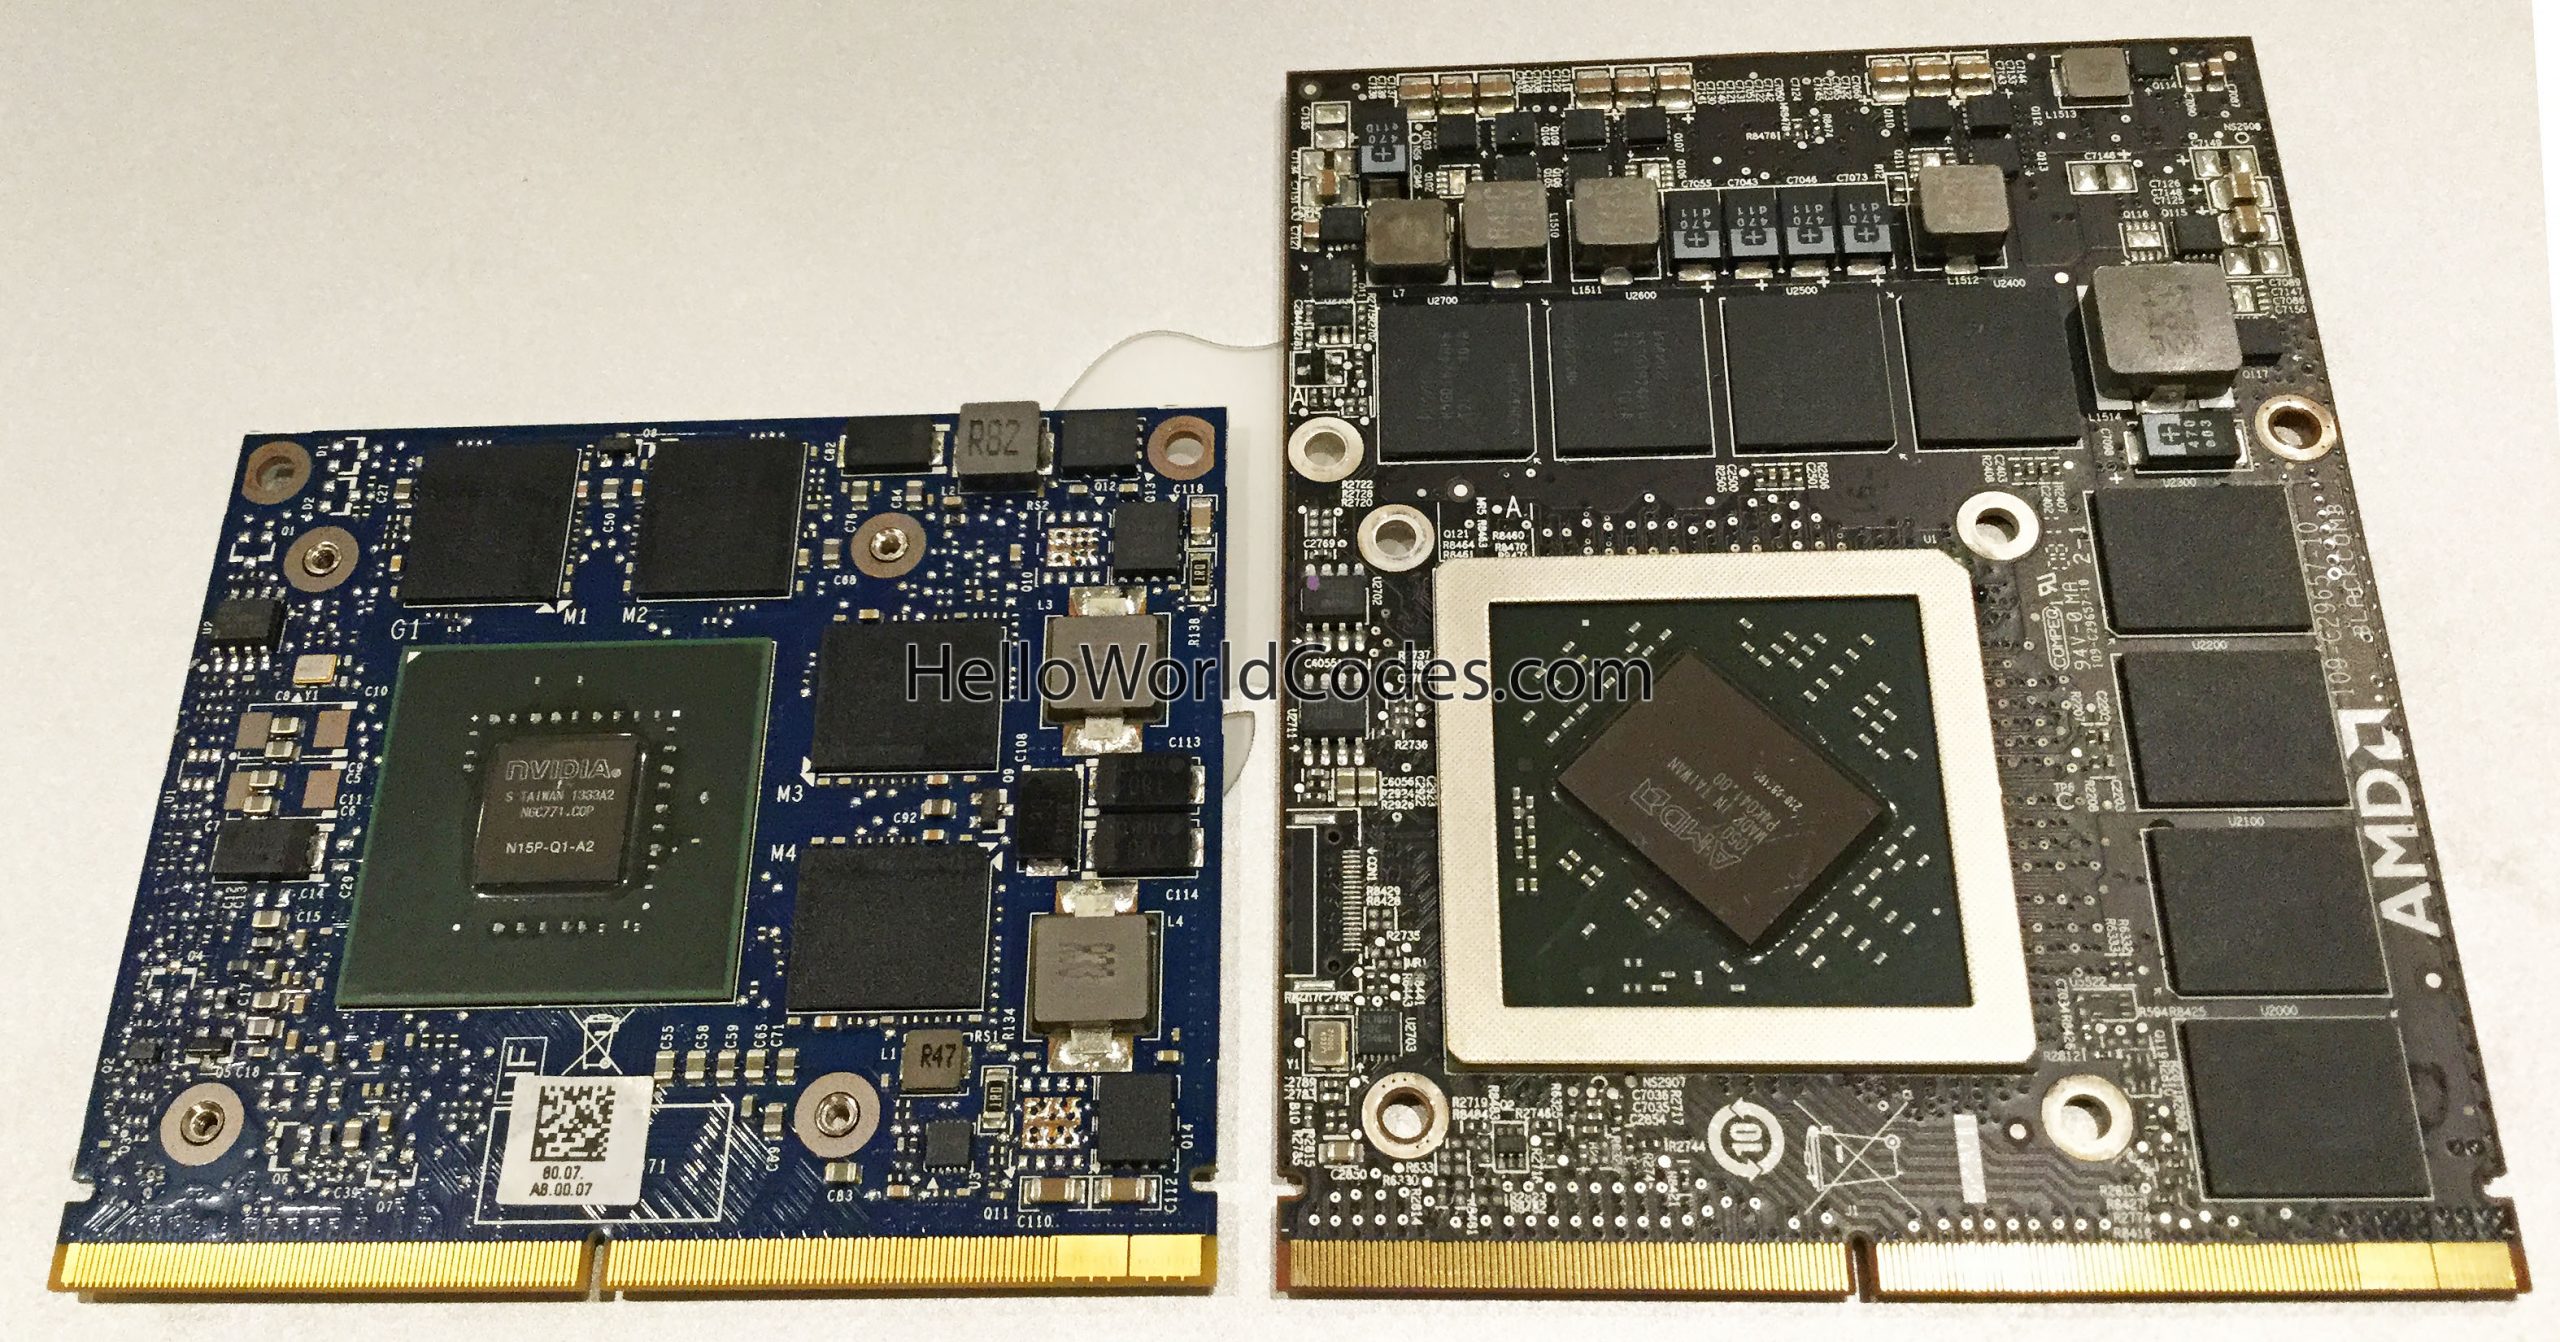
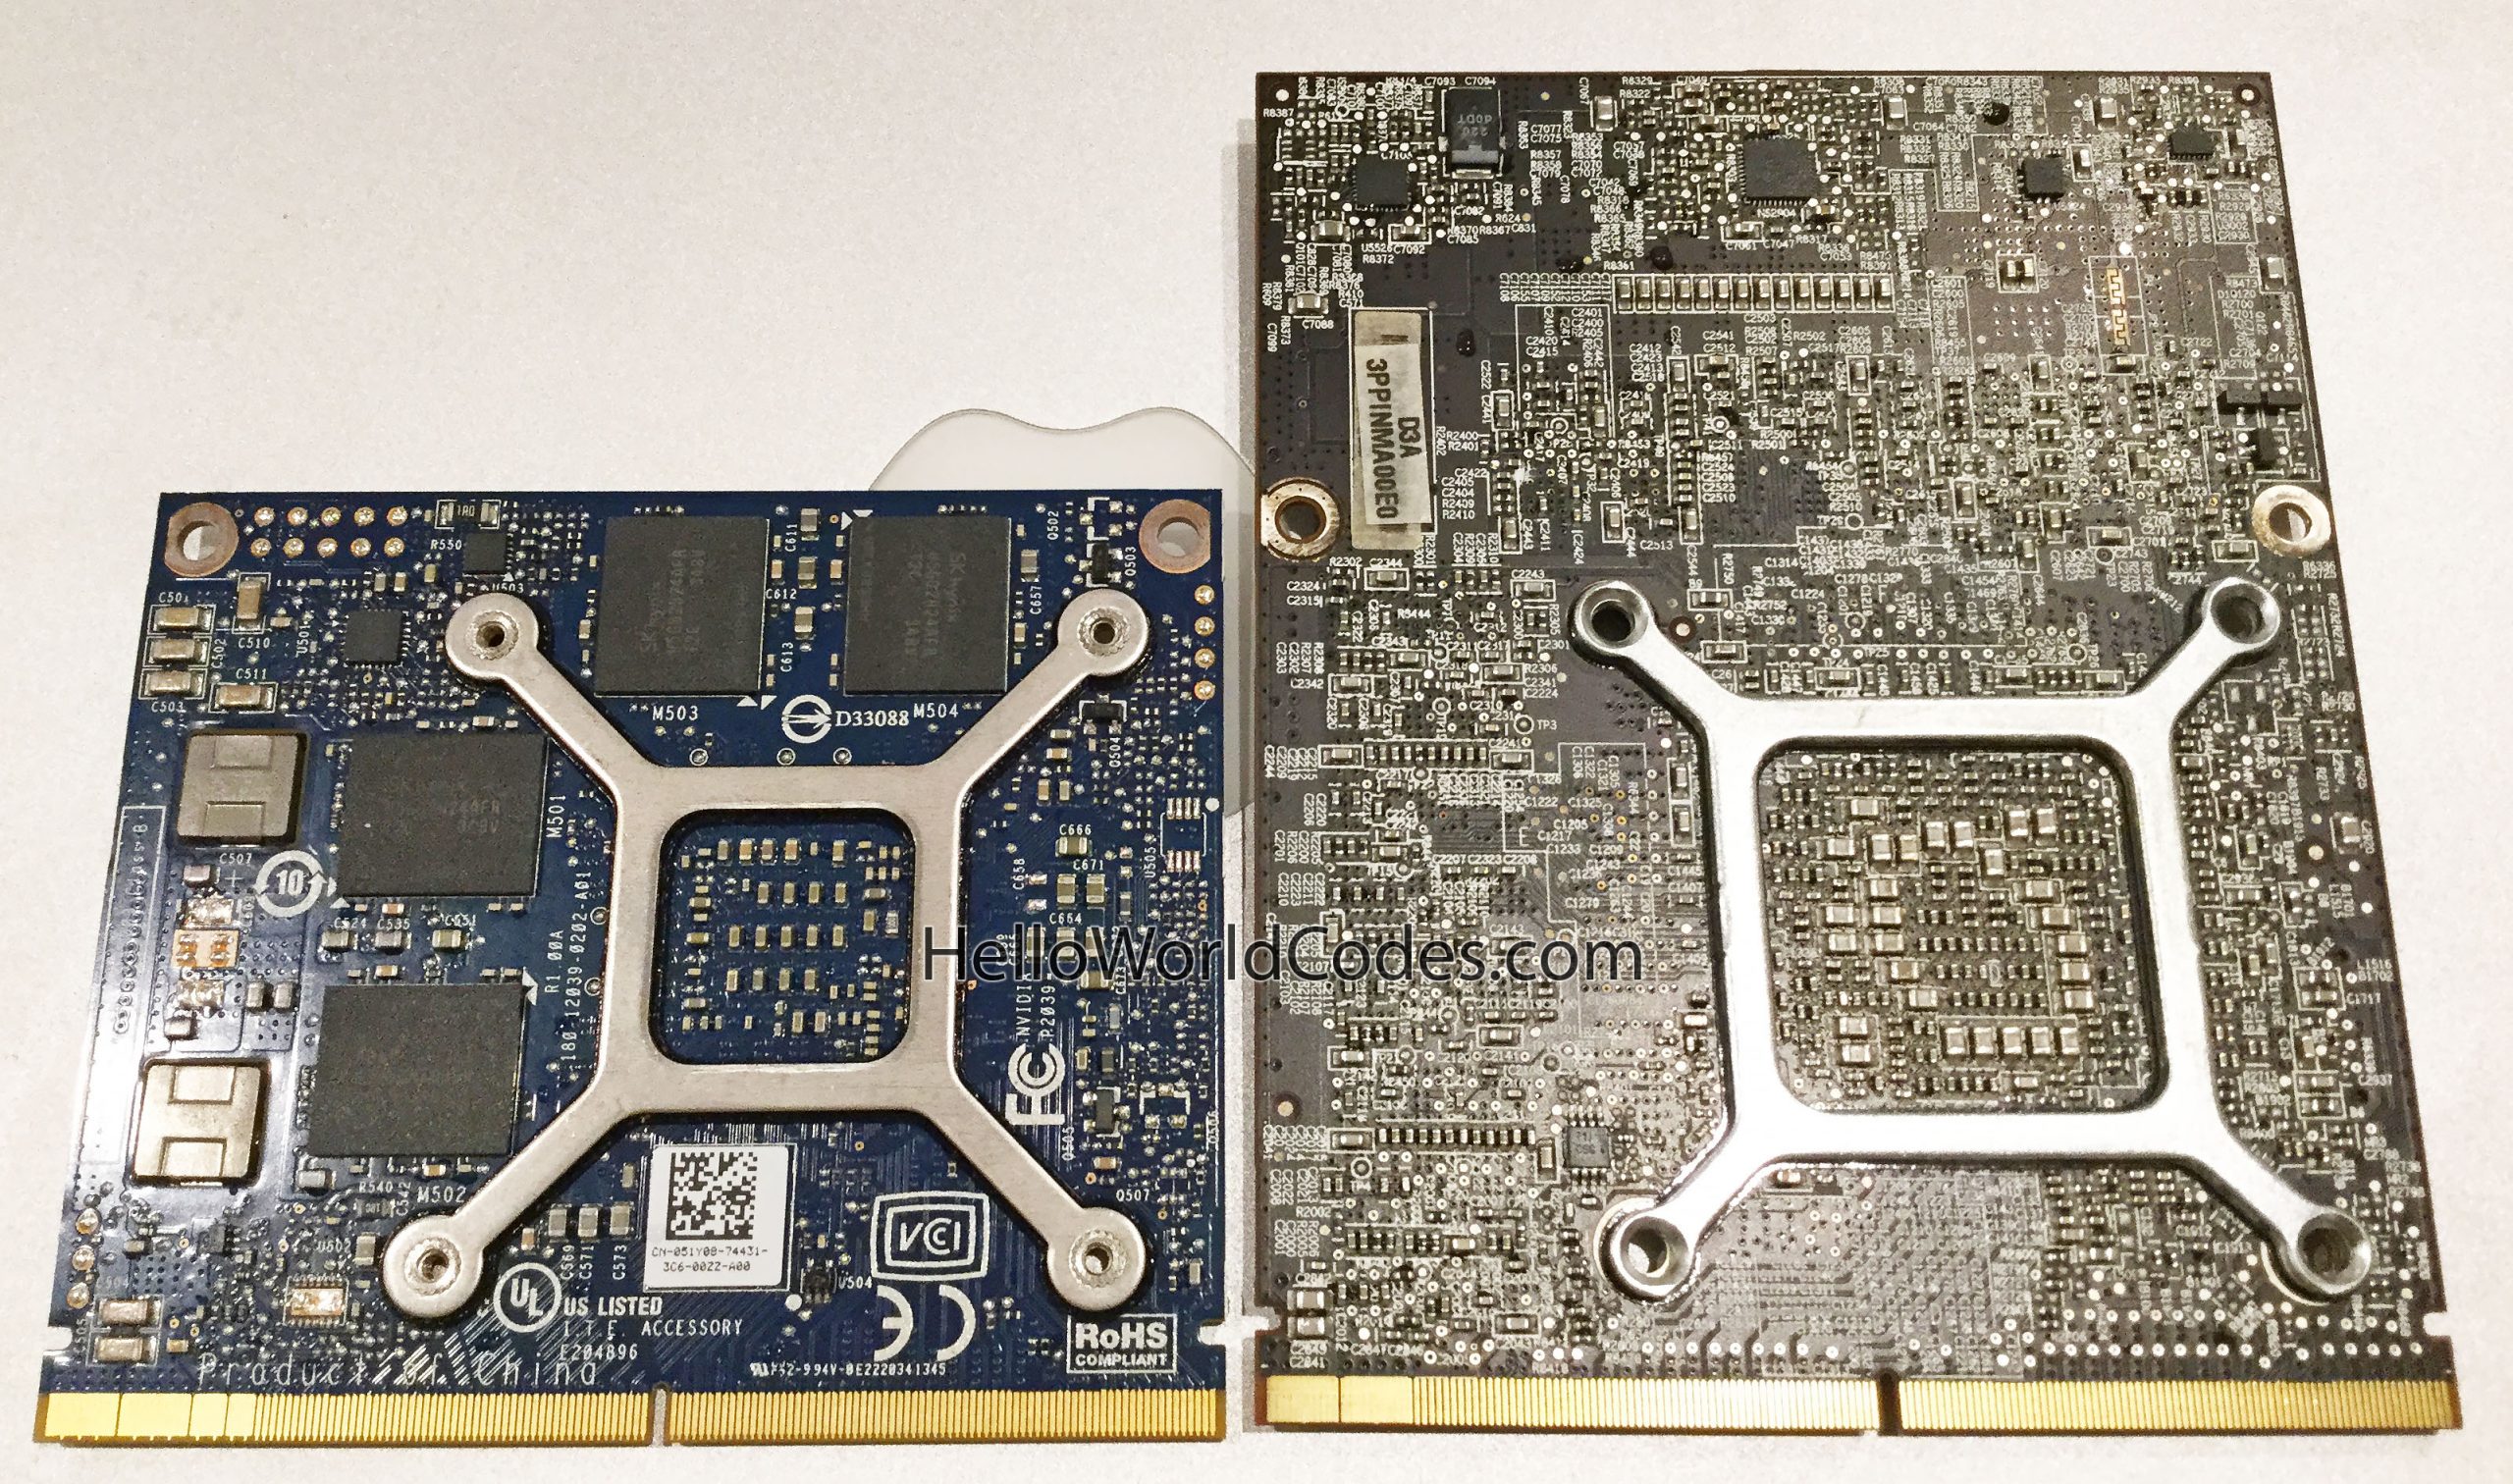
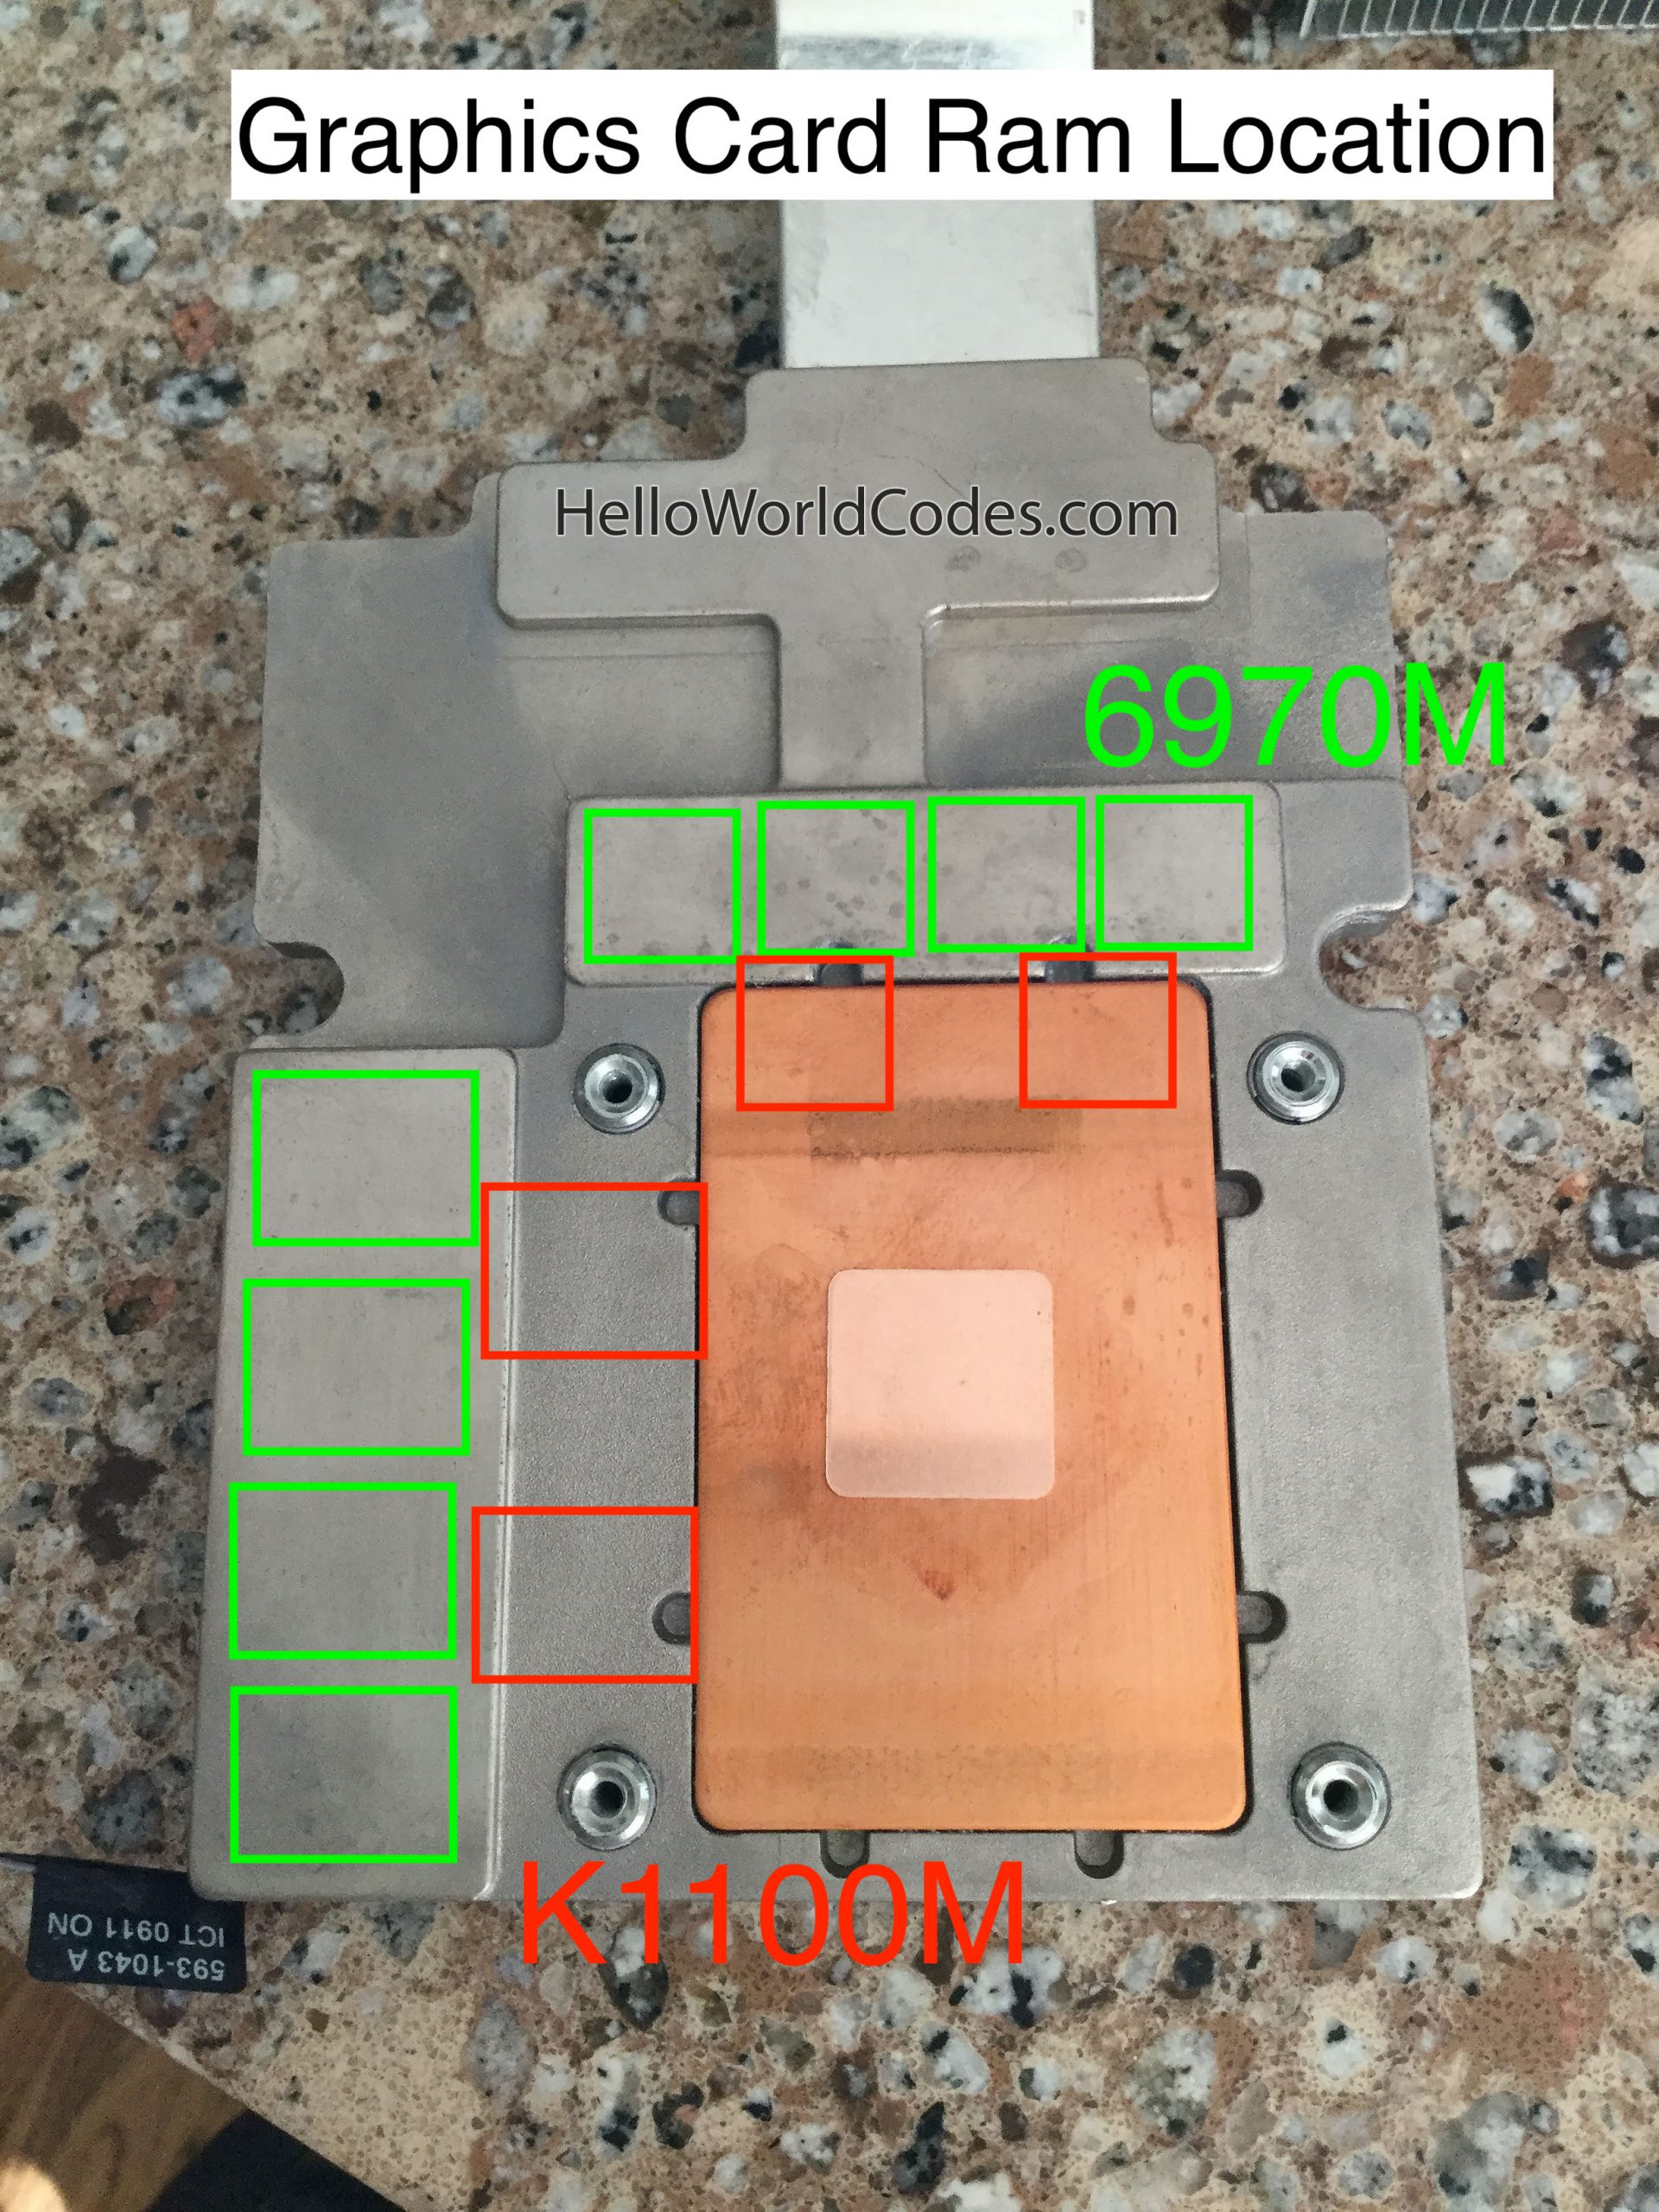
K1100M vs 6970M
Gather Necessary Items And Files
Items
- NVIDIA K1100M graphics card
- Thermal pads – 1mm
- Thermal paste
- Copper shim – 1mm
- USB thumb drive (1 is enough, but 3 would be convenient)
- An ethernet cable
Files
- 2011_imac_usb.zip – by xanderon @ macrumors.com
- macOS Catalina Patcher.dmg (1.4.4 was used with macOS Catalina 10.15.6) – by dosdude1
- AppleGraphicsControl.kext.zip – by highvoltage12v @ macrumors.com
- Hackintool (3.4.4 was used)
- iMac OpenCore Loader.dmg – by Nick [D]vB @ macrumors.com
- Catalina intel sandybridge graphics.zip – by highvoltage12v @ macrumors.com
- AppleGVA.framework.zip – by highvoltage12v @ macrumors.com
- Macs Fan Control (1.5.7 was used)
- macOS High Sierra installer (if the iMac has never had this OS version or higher installed)
Modifying the X bracket of the K1100M
- Carefully pry the X bracket off from the K1100M (hair dryer or heat gun may help soften the glue)
- Drill out a larger hole through the brass threaded nut, or have the nut pressed out entirely (I chose to press the nut out)
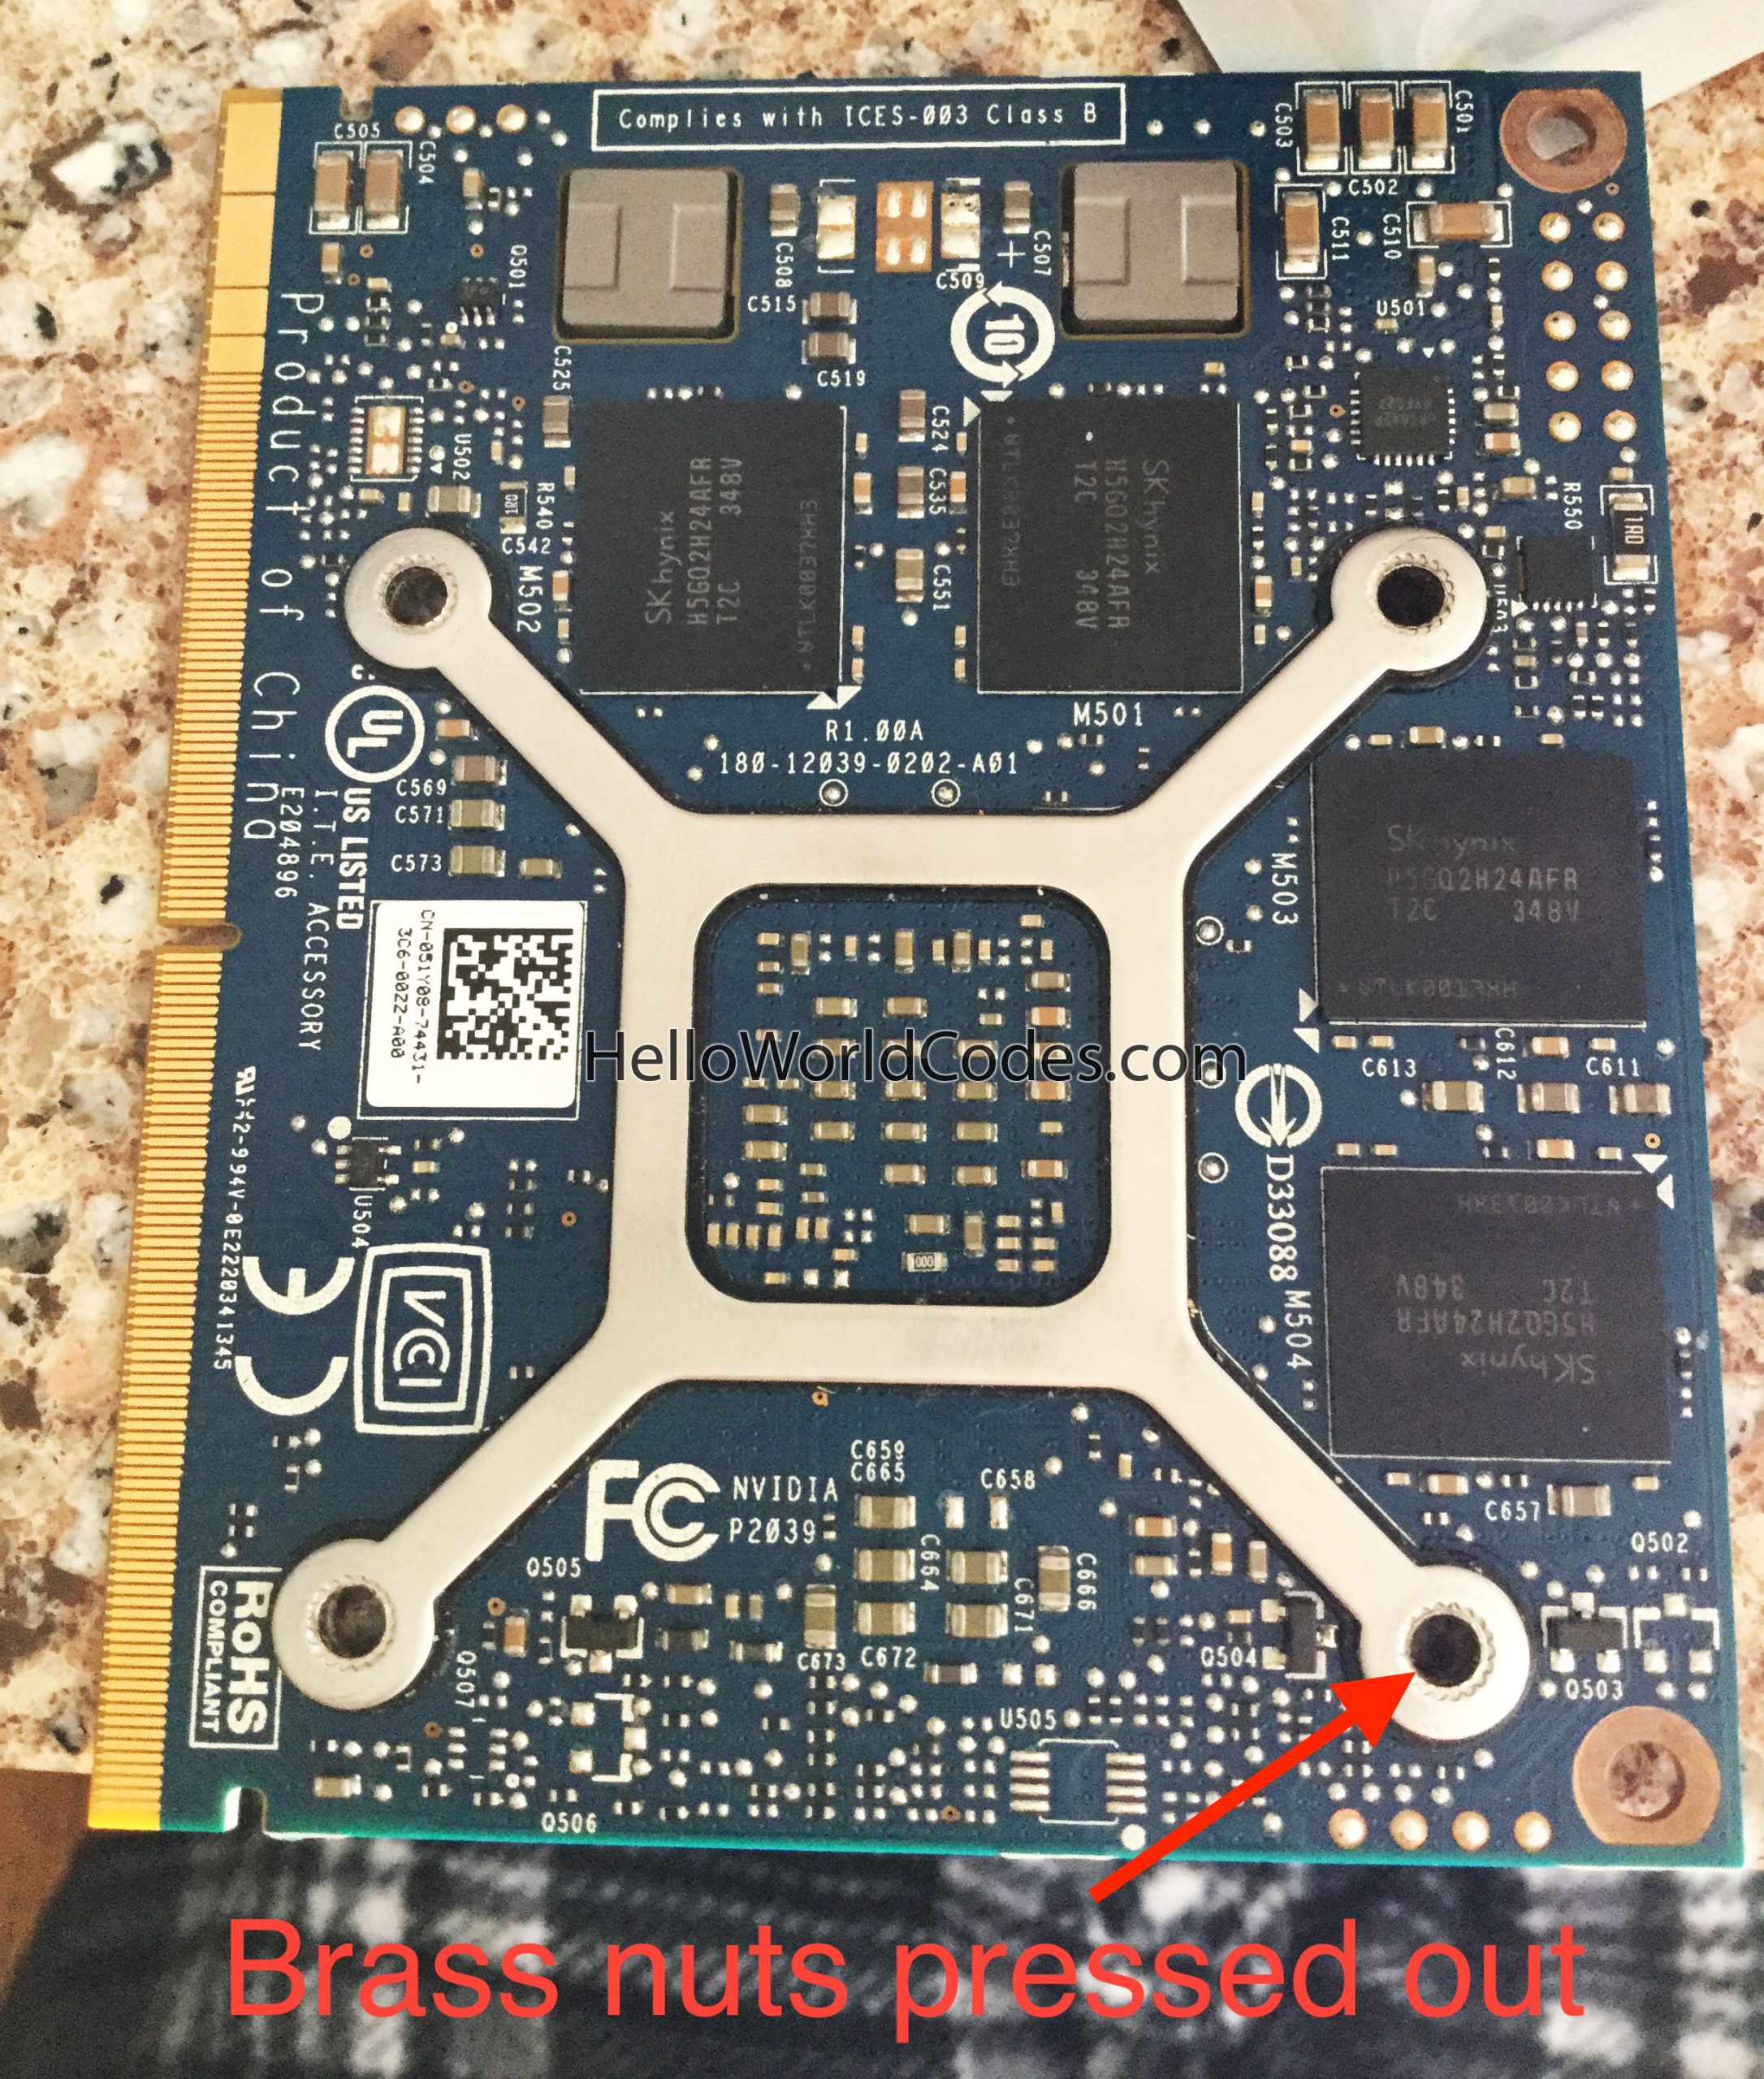
I did not reuse the X bracket from the 6970M since there are tiny surface mounted components on the K1100M card where the bracket would lay on top.
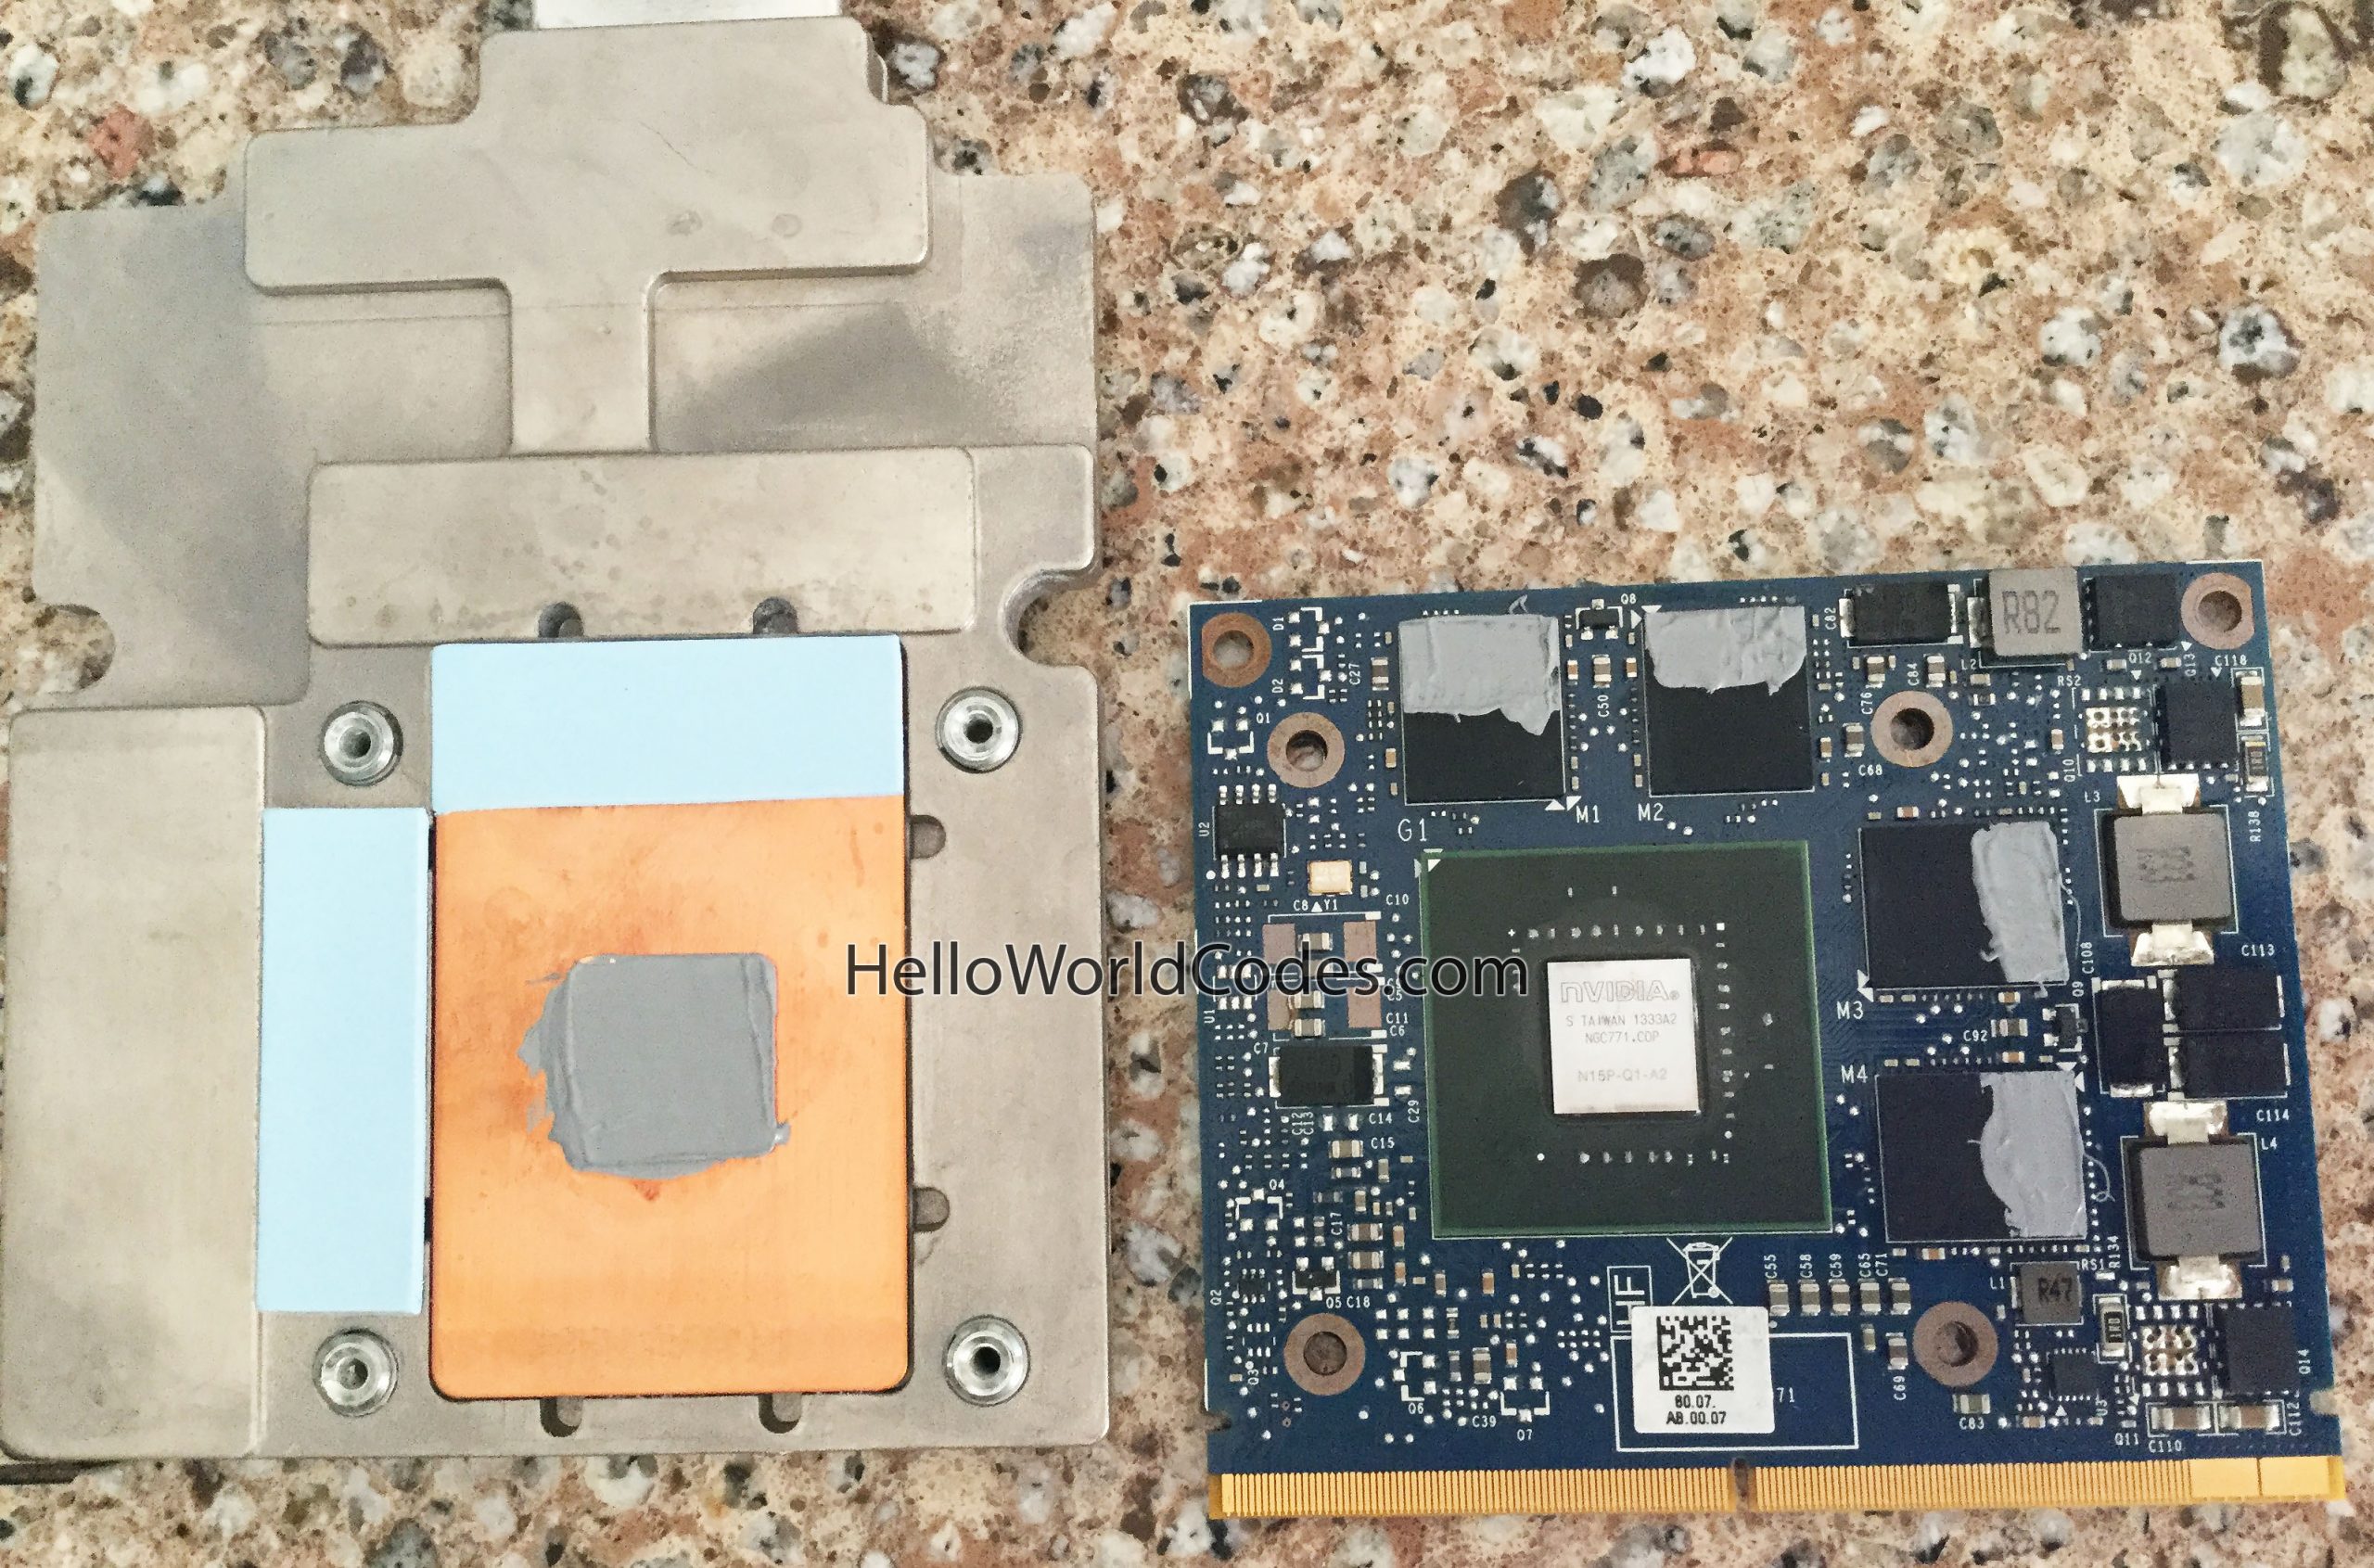
Mating the K1100M card onto the heat sink
- A 1mm copper shim is needed for full contact between the GPU die and the heat sink. Apply thermal paste on both sides of the shim.
- Add thermal pads on specific parts of the heat sink for the graphics card ram. Ram location is different from the 6970M, so the pads needed to be place next to the raised area of the heat sink.
Partially Reassemble
Assemble the iMac except for the following:
- Display assembly – For troubleshooting and later SSD/HDD reconnection
- SSD/HDD – Leave disconnected for ease of blind booting from USB
Flashing the K1100M bios
- Using Disk Utility, format a USB thumb drive as GUID Partition Table + FAT32 (MS-DOS FAT)
- Unzip 2011_imac_usb.zip into the USB thumb drive
- Connect an ethernet cable from the iMac to your network
- Insert the USB thumb drive into the iMac and boot the system up
- Once the iMac has boot the OS from the thumb drive (about 1 minute), an IP should be assigned by your router. Look for a device named “grml” in the router and make note of the IP.
- From another computer on the network, SSH into the iMac
-
1ssh root@<ip>
- password is “flash”
-
- Change to the working directory:
-
1cd /lib/live/mount/medium/flash
-
- Follow the commands in the “README” file in that directory. Note these steps:
- Step 4: Run the command on your local computer, not in the iMac from ssh.
- Step 6 command for the K1100M card:
1./nvflash_linux -6 Quadro_Beta1.2/K1100.rom
- Shut down the iMac
Finish iMac Reassembly
- Complete the iMac reassembly with SSD/HHD and display assembly installed
- Remove the USB thumb drive
- Ethernet cable can be disconnected as it is no longer needed
Create Patched Catalina Installer
The following instructions are for installing a new copy of Catalina on a blank hard drive.
- Using Disk Utility, format a USB thumb drive as OSX Extended Journaled (Mac OS Extended Journaled)
- Open macOS Catalina Patcher.dmg, and follow the instructions to create the installer onto the USB thumb drive. (macOS Catalina 10.15.6 was used in this write-up)
- Insert the USB thumb drive into the iMac
- Turn on the iMac and hold the “option” key down after the chime to initial the boot selection screen
- Choose the USB thumb drive to boot (this may be the only boot option if the SDD/HHD is blank)
- Once booted into the USB thumb drive, click “Disk Utility”
- If there is a message that says “A system firmware update is required on this machine in order to boot from APFS volumes” then macOS High Sierra would need to be installed first to update the system firmware, then return back to this step.
- Select the drive you want Catalina installed on and erase/format it as APFS format
- After the format is done, click “Reinstall macOS”
- During the OS installation process, it will reboot a couple of times. Each time it reboots, the screen will remain black (not just through the boot process). This is due to macOS Catalina version 10.15.4 and later. When this happens, you can force shutdown using the power button, power up the iMac again, and hold the “option” key after the chime to get the screen to the boot selection screen (this is the only way to get the screen to be displayed).
- Select the SSD/HHD to boot from and it will continue the installation from where it left off. If the installation reboots again into a black screen, repeat this process. The installation will eventually complete.
- Catalina installation should now be completed. At this point, each time you start the system, you will need to hold the “option” key during boot up to get to the boot selection screen. This is to initiate the screen to light up until the black screen gets fixed later in the process.
Fix Missing Audio Device
After the installation of the OS, I had noticed that my system did not detect any audio devices, thus no sound was being produced after the macOS has loaded up. The chime still can be heard during boot up, so I knew it was software related and not hardware. Below are the steps on how I fixed this issue.
- Boot the system with the “Patched Catalina Installer” USB thumb drive
- Click “macOS Post Install”, click “Continue”
- Deselect “Legacy audio patch”, click “Apply Patches”
- Continue to load the OS, then restart the system and repeat these steps except select “Legacy audio patch” this time.
- The audio device is now showing up for me, and sound can be utilized
Fix Black Screen
Since I installed macOS Catalina version 10.15.6, the screen will remain black the entire time if “option” key is not used during boot up to initiate it to light up. This black screen issue began from version 10.15.4 and up. To fix this issue, follow these steps:
- Disable SIP
- Boot the system with the “Patched Catalina Installer” USB thumb drive
- Click “Utilities” in the menu and click “Terminal”
- Use the following command to disable SIP
1csrutil disable - Restart the system and boot back into macOS
- Transfer “Hackintool” and “AppleGraphicsControl.kext” files into the iMac
- Open Hackintool
- Click “Utilities”
- Click the bottom icon that says “Disable Gatekeeper and mount the disk in read/write mode”. There should not be any errors in the output.
- Click the bottom icon that says “Install Kext(s)”
- Select the “AppleGraphicsControl.kext” file, then click “Select”
- For the destination, choose “System/Library/Extensions”, then click “Select Destination”
- Once this process is finished, rebooting the system should now show display without needing to use the “option” key.
Fix Brightness Control
Below is my exact process, but another guide by herrdude @ MacForums can be found here.
- Insert an empty USB thumb drive
- Transfer the “iMac OpenCore Loader.dmg” file to the iMac
- Open “iMac OpenCore Loader.dmg” file to mount it
- Open Disk Utility
- Select the USB thumb drive volume, not disk. Selecting the disk will result with an error when trying to do the next step
- Click “Restore”
- In the “Restore from:” dropdown selection, choose “iMac OpenCore Loader”.
- Click “Restore”
- The USB thumb drive will now be named “Catalina Loader”. Open this drive in Finder and press the key combination command+Shift+. to show hidden files and folders.
- Navigate to “EFI/OC” directory
- Rename the “config.plist” file to something like “config_bak.plist”
- Unzip the “NVIDIA config.plist.zip” file that is within that directory
- Open the file “OpenCore Configurator” located in the root directory of the USB thumb drive
- Go back to the “EFI/OC” directory and double click extracted “config.plist” file. This will open up in the OpenCore Configurator app
- Click “Misc” on the left side
- Change “Picker Mode” from “External” to “Builtin”
- Click “File” -> “Save”
- Open Mac’s “System Preference” -> “Startup Disk”
- Click the lock to unlock, then select “Catalina Loader”
- Click “Restart…” button
- The system will boot Catalina Loader, in which it will then offer selections which system you want Catalina Loader to boot. Select the macOS Catalina drive with the arrow keys. Once selected, press Control+Enter. This will let the Catalina Loader use this option as the default drive to load each time.
- Once booted into macOS, verify brightness control works
- If brightness control works, open the “config.plist” file again with OpenCore Configurator
- Click “Misc” on the left side
- Uncheck “Show Picker”
- Click “File” -> “Save”
- Reboot the system and the Catalina Loader boot picker should not show the boot options and automatically boot the macOS drive
The system has to boot from the Catalina Loader USB thumb drive each time for brightness control to work. What I chose to do was to create a small partition from the macOS drive (Mac OS Extended Journaled), restored the USB thumb drive onto that partition (using Disk Utility) and boot the Catalina Loader from that partitioned drive instead of having to leave the USB thumb drive connected to the iMac.
Fix Wake From Sleep
At this current state, the OS will not wake up from a sleep, but rather hang on a black screen for several minutes until it automatically reboots. The following steps will help fix this issue.
- Open Hackintool
- Click “Utilities”
- Click the bottom icon that says “Disable Gatekeeper and mount the disk in read/write mode”. There should not be any errors in the output.
- Transfer “Catalina intel sandybridge graphics.zip” file to the iMac
- Double click the file to extract it
- Drag the following kexts onto the Kext Utility app
- AppleIntelHD3000Graphics.kext
- AppleIntelHD3000GraphicsGA.plugin
- AppleIntelHD3000GraphicsGLDriver.bundle
- AppleIntelHD3000GraphicsVADriver.bundle
- AppleIntelSNBGraphicsFB.kext
- AppleIntelSNBVA.bundle
- AppleMCCSControl.kext
- IOSurface.kext
- Reboot the system
- Sleep and AirPlay should now work
Enabling Intel Quick Sync
- Open Hackintool
- Click on “Utilities”
- Click the bottom icon that says “Disable Gatekeeper and mount the disk in read/write mode”
- Transfer the “AppleGVA.framework.zip” file to the iMac and unzip it
- Replace the folder /System/Library/PrivateFrameworks/AppleGVA.framework with the extracted one
- Open Terminal and type the following commands:
-
1sudo chmod -R 755 /System/Library/PrivateFrameworks/AppleGVA.framework
-
1sudo chown -R 0:0 /System/Library/PrivateFrameworks/AppleGVA.framework
-
- Reboot the system
- (Optional): To check that Intel Quick Sync is enabled, download MacX Video Converter
- Open the app
- “Intel/AMD/Nvidia” should be checked
- Click the “i” icon and it should display “Hardware Encoding Supported: Yes”
Add Fan Control
Fan control for the graphics card is gone after the swap, so a third party fan controller app is needed.
- Install Macs Fan Control
- Set the ODD to custom fan control based on GPU Heatsink
- (Optional) Set the fan control for the CPU and/or SSD/HHD
- Set to autostart during login